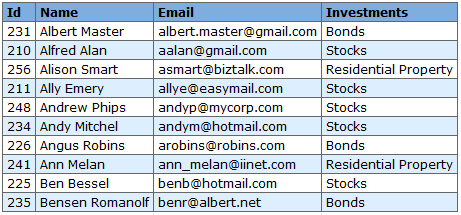
One of the most useful Click controls is the Table control.
An example usage of the Table control in a customers Page is provided below:
public class SimpleTablePage extends Page {

    @Bindable protected Table table = new Table();

    // Constructor ------------------------------------------------------------

    public SimpleTablePage() {
        table.setClass(Table.CLASS_ITS);

        table.addColumn(new Column("id"));
        table.addColumn(new Column("name"));
        table.addColumn(new Column("email"));
        table.addColumn(new Column("investments"));
    }

    // Event Handlers ---------------------------------------------------------

    /**
     * @see Page#onRender()
     */
    @Override
    public void onRender() {
        List list = getCustomerService().getCustomersSortedByName(10);
        table.setRowList(list);
    }
}
In this Page code example a Table control is declared, we set the table's HTML class, and then define a number of table Column objects. In the column definitions we specify the name of the column in the constructor, which is used for the table column header and also to specify the row object property to render.
The last thing we need to do is populate the table with data. To do this we override the Page onRender() method and set the table row list before it is rendered.
In our Page template we simply reference the $table
object which is rendered when its toString() method
is called.
<html> <head>$headElements</head> <body>$table$jsElements</body> </html>
Note from the example above that we specify the $headElements
reference so that the table can include any HEAD elements, which includes Css
imports and styles, in the header. Also note we specify the
$jsElements reference which include any JavaScript imports
and scripts at the bottom. At runtime Click automatically makes the variables
$headElements and $jsElements available
to the template.
At runtime the Table would be rendered in the page as:
